Lecture Tools for Online Teaching: Video, Narrated, and Interactive
From the Series: Online Tools for Hybrid and Remote Teaching
From the Series: Online Tools for Hybrid and Remote Teaching
For the first post of this series, we are highlighting platforms that invite you to step back from your lecturing soap box, as many studies have shown that lecturing online for more than five to ten minutes will guarantee the loss of interest from your students. So, how can we continue to engage our students while navigating different paths for providing our students with pertinent material? Scholars and instructors note that assigning a series of short five- to ten-minute videos addressing specific topics allows students to pay attention in short time spans and absorb more information than in longer video lectures. You could record yourself lecturing on Zoom, but are there other good options?
This post gives you information on different platforms for making videos, narrations, or interactive pages for supplementing synchronous discussions and lectures or in lieu of synchronous materials. You can create these videos or interactive pages to provide information on classroom conduct, explanations of class assignments, or to make smaller, accessible lecture materials. Integrating these (if possible) into your institution’s learning management system (LMS) reduces the amount of labor your students exert to keep up with material on different web platforms. If you already have class materials and lectures prepared, these video options can be streamlined by copying and pasting into the panels or narrating over previously created slides. Alternatively, if you are in the process of creating a new class, these materials can act as scaffolding for building a script or outline for your classes. This post will discuss the following platforms: VoiceThread, Lumen5, Adobe Spark, and (briefly) ArcGIS Story Maps.
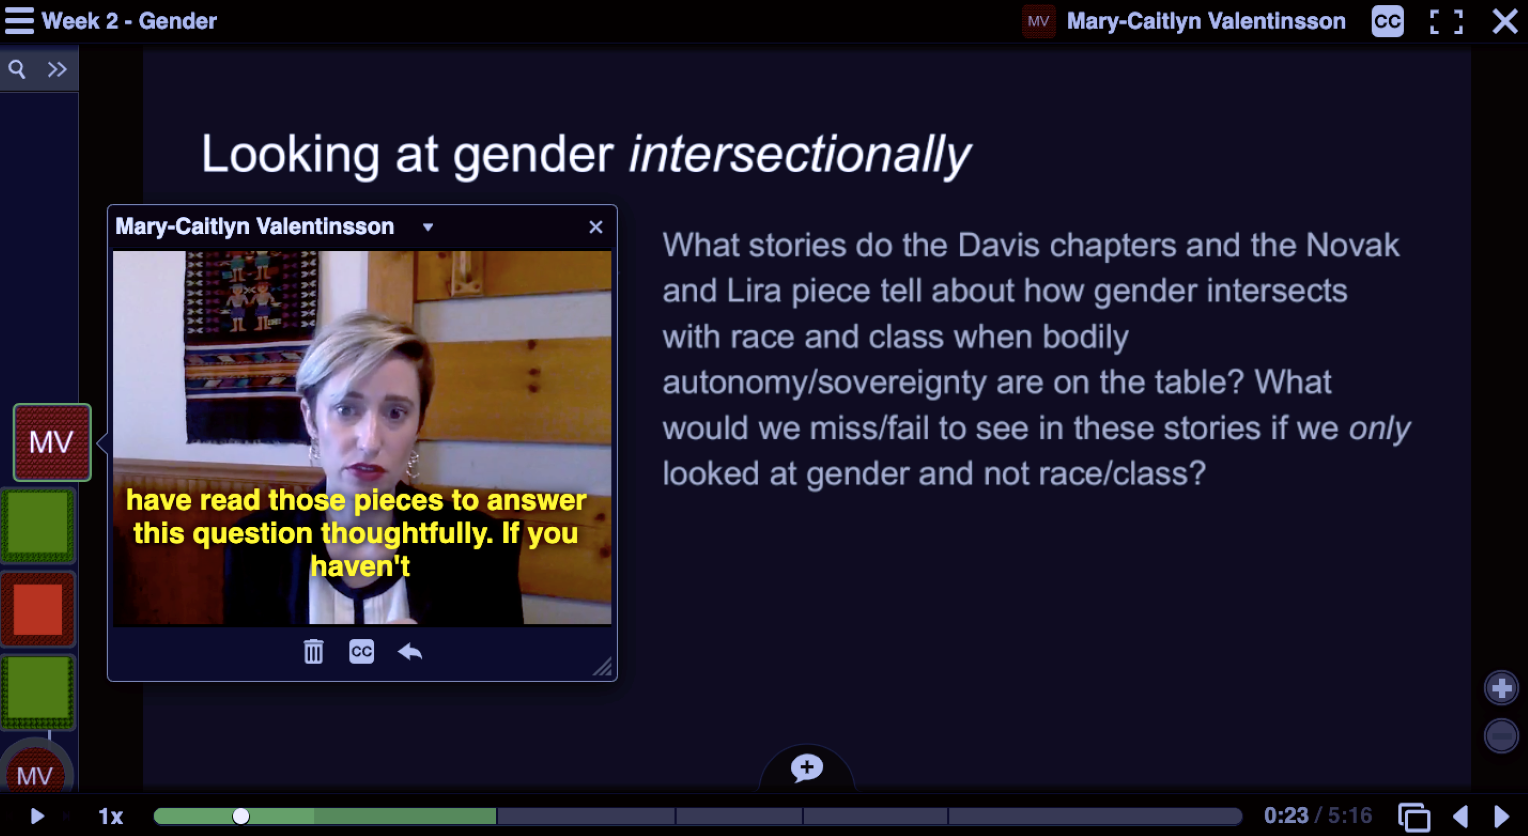
VoiceThread is a cloud-based tool that allows you to upload various different media (PowerPoint slides, Google Slides, images, documents, and more), and add audio/video or text-based commentary to these media. Many universities have a subscription to VoiceThread and integration with their LMS, but if your institution does not have an account, here you can find additional license information. For the lowest cost option, you are allowed one instructor and up to fifty students—more students cost extra. Mary-Caitlyn finds it to be a much more elegant solution for content delivered in a lecture-style format than using, e.g., the native PowerPoint record-to-slide function, which then requires you to upload a PowerPoint file for your students to download. She typically puts together lecture slides in Google Slides, which she uploads to VoiceThread. Once the slides are processed in VoiceThread, Mary-Caitlyn records audio/video narration on each slide, walking students through the important points she wants them to capture or directing them to complete a participation activity by adding a text, audio, or video comment to the slide in question. You can see examples of what this looks like visually in the images below (with student initials, names, and writing blacked out).
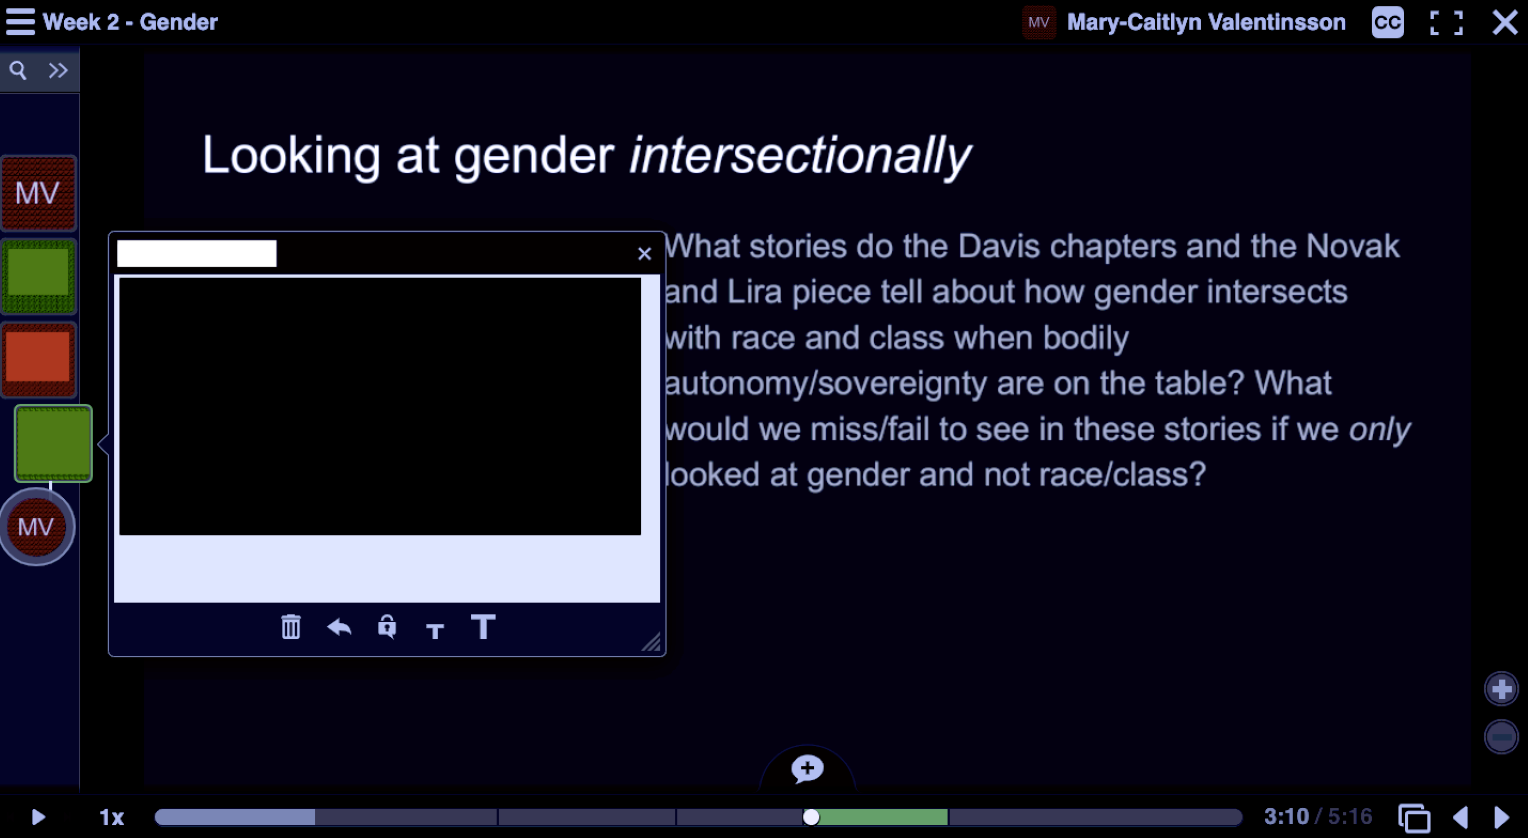
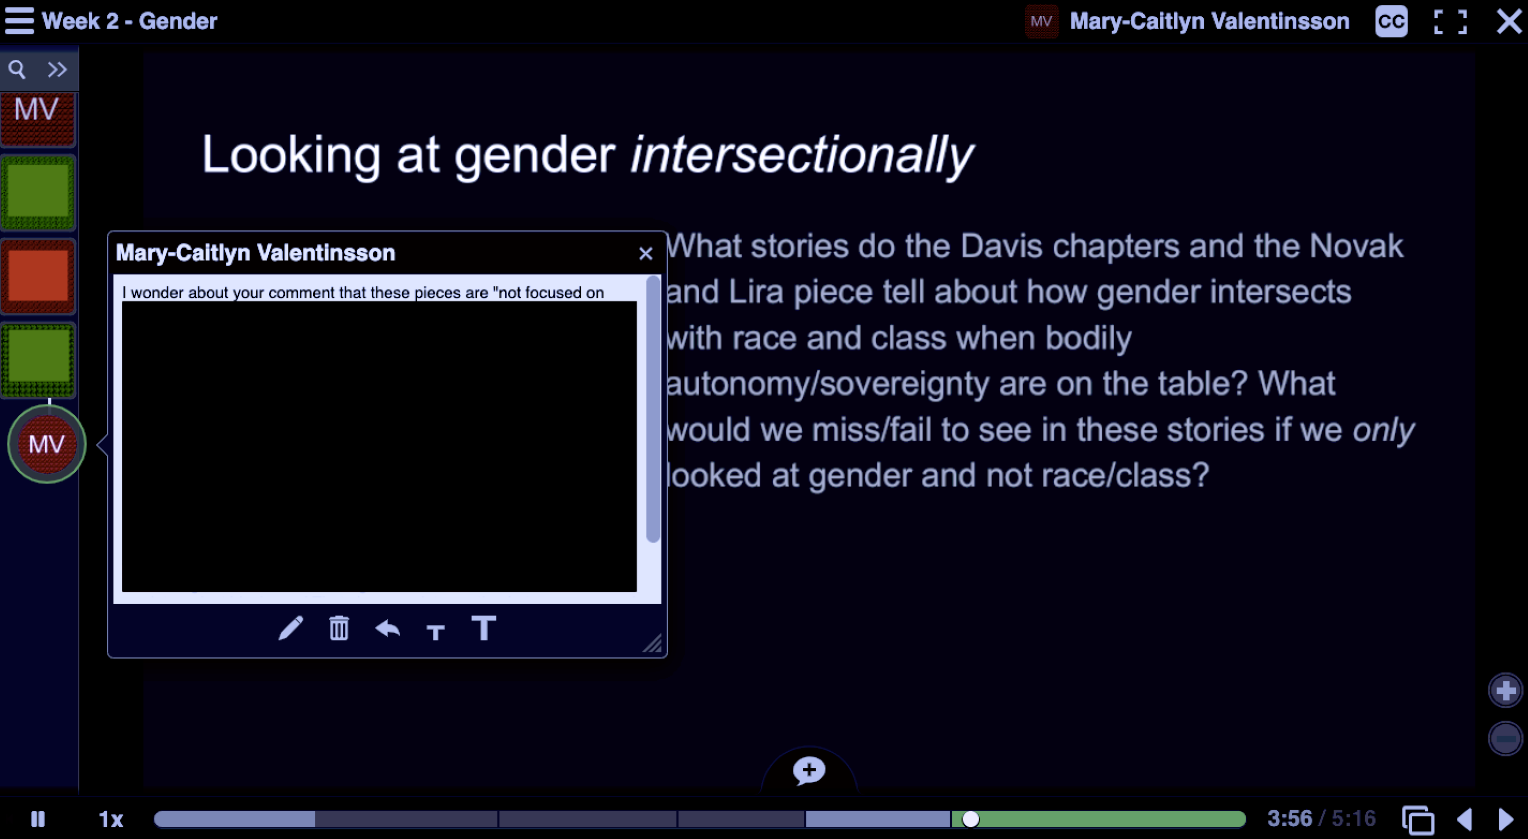
There’s nothing for students to download and open on their own computers, as it’s all cloud-based, and the comment functions allow students to directly respond to the instructor’s narration and each other’s comments. Another benefit of this set-up is that it allows for asynchronous participation—students can watch and respond to VoiceThreads on their own time, so long as they have an internet connection. Universities with a VoiceThread subscription often also have integration with LMS gradebooks, making it easy to require, for instance, at least one video/audio/text comment per VoiceThread lecture. VoiceThread can also be used for students to upload their own slides, documents, or other media, and get feedback on them from other students and the instructor in the form of text, audio, and video comments—this could be useful for courses that typically have a student presentation component when delivered in-person.
Two cons of VoiceThread:
(1) It’s difficult to edit slides after they are uploaded to the platform. While individual slides in a VoiceThread presentation can be deleted and re-arranged, you can’t alter text or images on the slide. Extra-careful proofreading is required.
(2) Captions can be tricky to manage. If your university has a subscription, you may be able to request automatic captions from VoiceThread directly. They take about four days to process (so you must make sure to do this before the course begins—which means you also need all your VoiceThread lecture content prepped ahead of time). Mary-Caitlyn finds them to be of middling quality, but they can also be edited by hand once initially processed. (You can also, of course, upload your own caption files to each slide narration.)
Lumen5 is a free online tool where you can create videos with text, visual, and musical content that can be the vehicle for your lecture materials. After creating an online account, you are given access to different templates, photos, and other media with which to build your videos, as well as a series of online video tutorials and blogs from different Lumen5 contributors. In each project, make sure to choose a format that fits your needs and note that you are also free to incorporate your own media, images, and sounds.
The premise for using Lumen5 is breaking down your content into different panels, each panel can be displayed for a customizable amount of time and can have images/content that is independent from panels around it. The text and media content for these panels can come from a variety of sources: previous assignment handouts, previous PowerPoint lecture scripts, or new content you want to make into a video for a new class. For instance, if you already have a script from a PowerPoint presentation or lecture, you can copy that script into Lumen5 to generate the text content of your video. When you’ve created this script, you can go into the storyboard area to separate the text into different panels for your video, where you can drag and drop text and media material into the video. There is no integrated narration tool in this platform, but you can upload narration “music” files to different panels if you choose to do so. When building the video, you choose how long a panel will be shown to students—a good rule of thumb: more time for more information/more text on the panel. Make sure to preview the video to see how fast these panels move, and think about accessibility of students when choosing how much time each panel can be up.
Once you’ve completed your video content, you can preview the material all together. If the preview meets your needs, you can click Publish, and the Lumen5 platform renders your video for you automatically. The video will show up on your dashboard. From here, you can choose one of three options about how it will be shared: the video can be publicly accessible, accessible to anyone with a link, or made into a private video (where only those who have access to your dashboard can see the video content). Once you have shared the video URL or uploaded the file to your LMS, your audience will have access to the video.
Also note that Lumen5 publishes the text or script of your video below the video player (click Show More), creating more accessibility for students. While there is no text-to-speech option, the content of that script can be copied and pasted into tex-to-speech programs for higher accessibility.
Unfortunately, there is no way to name your video anything other than what is listed on the first slide, which could be confusing if you have a strict way you usually name files. However, you can download the video instead of sharing the URL, which allows you to upload the video to the cloud and share through your LMS.
Adobe Spark has some similar capabilities to Lumen5 with video creation, but it also includes capabilities to make scrollable page materials. Adobe Spark has a third option for creating graphics, but these function more as flyers so we will not discuss them in this post. If you have access to Adobe Creative Cloud, Adobe Spark can save you from signing up for another platform. However, if you do not have access to the Adobe Suite, these programs can require a monthly payment (click here for more information).
Similar to other video creation platforms, you can create a streamlined video of your content to share with students. To avoid repetition with the Lumen5 portion of this post, the Adobe Spark video creator has many similar options to choose from, including templates, photos, videos, and music. If you use content from the site, an automatic credit slide is created as the final slide of your presentation for these elements; you can add your own readings cited or resources to this slide.
Adobe Spark, similar to Lumen5, works in panels. You can create content for each panel from existing materials for your courses or you can create new material scripts for a video. There is a character limit, so you can be sure to keep everything brief.
One of the benefits of Adobe Spark is that you can create a “narration” or a voice-over for each of your panels to read the text for accessibility or to expand the text included on the slide. This voice-over determines the length of the slide (up to thirty seconds), but if you choose not to include a voice-over, you are free to determine how long the slide should be shown in the video (again, up to thirty seconds).
When you are happy with the content you’ve created, you can publish this video into your dashboard. From there, you can share or download the video, and even edit the name. When you share the video, your viewers do not get a text transcript, but if you use the narration feature, you can make these videos more accessible.
Instead of creating a video that moves at a pace designated by you in its creation, you can make an interactive page representation of your material. These pages can incorporate text, photos, videos, website linked, and other media to get messages across to students at their own pace. Students control the speed of scrolling through the webpage, and they can choose what elements on the page with which to interact more deeply (e.g., investigating web pages linked to the presentation longer than other students, watching a video more than one time, etc.).
The templates online can be helpful to see the capabilities of the program, but whether or not you use a template, you can incorporate photos, text, “buttons” (or links to other URLs), videos, photo grids, a “glideshow” (where the images scroll and change as you navigate the page), or split layout to pair text and images/videos with content.
Additionally, being able to incorporate many different resources into one single presentation eliminates the need for students to go searching around different areas of their institution’s LMS to make sure they have interacted with all linked asynchronous materials. If you are hoping to do an entirely asynchronous class, this could be a good way to organize your “lecture” with interactive activities incorporated into the page—giving students lecture materials, supporting video and visual information, and using the end of the page to prompt students for a reflection project, etc.
Similar to Adobe Sparks web pages, ArcGIS Story Maps is a platform where you can create scrollable pages that link to websites, videos, documents, etc. It is quickly gaining a large audience, especially by academics from a variety of fields for presenting research for public access. They are malleable for many different types of projects, and they allow creators to input images, videos, text, and maps (even those hosted by ArcGIS if you have access)—but their capabilities for sound and music are still being developed.
In highlighting these platforms, we hope to lessen the burden of this transition from in-person to remote learning practices. Each of the above platforms have different capabilities and uses for instructors in conveying course material, and we hope that highlighting a few of these can create time-saving opportunities for instructors at all levels.